
Blood Demon Arts
Slayers 2 Pyrokinesis (Explosive Blood): Moves & Timing
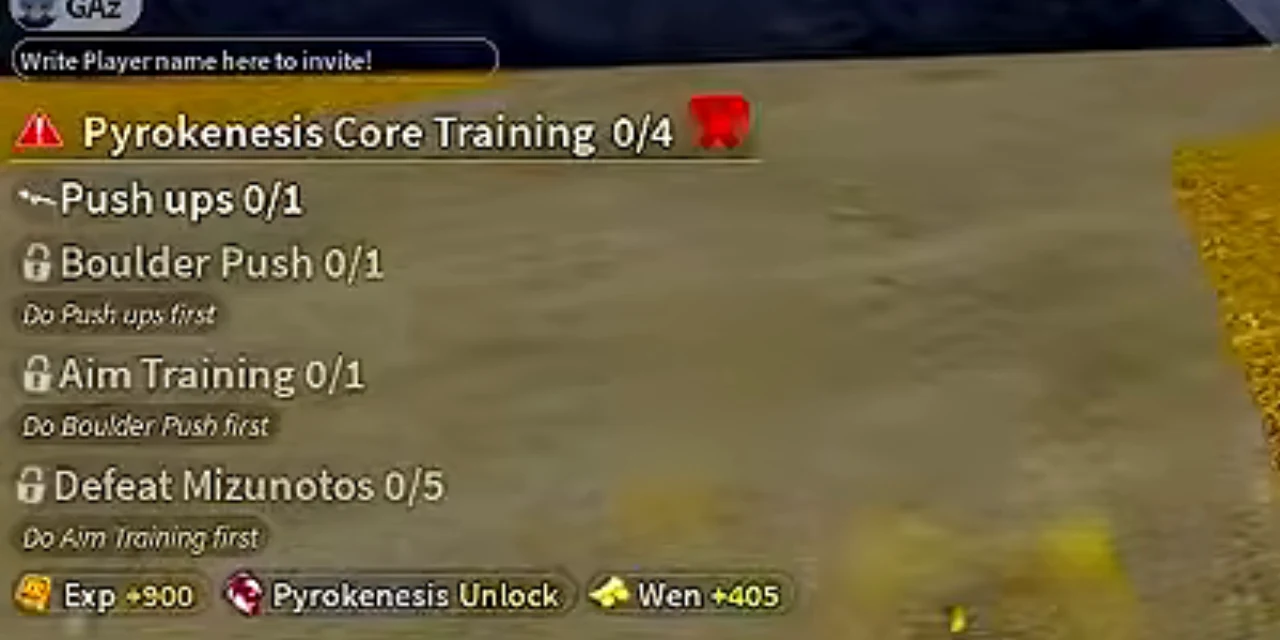
To learn Pyrokinesis in Slayers 2 (formerly Project Slayers 2), become a Demon, get its Orb through Muzan’s power roll or chest loot, and use it to start Pyrokenesis Core Training. Complete Push ups, Boulder Push, Aim Training and Defeat Mizunotos in that order. After training, open the Pyrokenesis skill-tree branch and unlock individual moves.
On this page
Muzan route and the Pyrokinesis Orb
Muzan offers Blood Demon Art rolls inside his lair. After becoming a Demon, equip the Biwa Bell and use it to return to him. Choose Give me your power to open the art roll panel.
An Orb from chest loot can start the same training route. Read the item’s use prompt and match it to Pyrokenesis Core Training before using it.
Night search for a first invitation; Biwa Bell return route for a Demon.
Muzan NPC guideKeep conversion, power rolls and hunt tasks separate.
- Complete the Demon conversion quest and use Muzan’s Blood if your character is still human.
- For Muzan’s roll, enter his lair with the Biwa Bell, talk to Muzan and select Give me your power. Inspect the required roll resource before confirming.
- Check the result in inventory. Pick the Orb for Pyrokinesis, or claim a suitable Orb from a boss chest; keep a skill scroll separate from the Orb.
- Equip the Orb and use its item action. On the default PC layout, click M1 while holding it. Confirm the tracker title is Pyrokenesis Core Training.
- Start the first unlocked objective below. Finish each row before traveling to the next marker.
Complete Pyrokenesis Core Training in order
The next exercise stays locked until the previous objective registers. Use the active task marker and completed row before moving on.
| Step | Objective | Where to go | How to finish |
|---|---|---|---|
| 1 | Push ups | Butterfly Estate Pushups mat | Use the Pushups interaction on the dark mat and click as the shrinking ring meets the outer ring. Check the row completes before starting the next task. |
| 2 | Boulder Push | Fenced course near the Boulder Split station | Guide the boulder through the open lanes toward the blue destination. Zoom out at blocked turns to find the route around the fence. |
| 3 | Aim Training | Butterfly Estate Target Shooting station | Start Target Shooting and click each appearing target. Keep your cursor ready for the next target, then check the completed Aim Training row. |
| 4 | Defeat Mizunotos (5) | Active Mizunoto quest marker; Mistfall Harbor route | Fight the Mizunoto Slayer enemies after the earlier exercises are complete. Check the named kill counter; a trainee boss is a different objective. |
Pyrokenesis training checklist
Check the completed rows and the art unlock reward before opening Skill Tree. A locked row names the preceding exercise you still need to finish.
Open the walkthrough for each exercise
Use the Pushups interaction on the dark mat and click as the shrinking ring meets the outer ring. Check the row completes before starting the next task.
Boulder Push walkthroughGuide the boulder through the open lanes toward the blue destination. Zoom out at blocked turns to find the route around the fence.
Aim Training walkthroughStart Target Shooting and click each appearing target. Keep your cursor ready for the next target, then check the completed Aim Training row.
Unlock Pyrokinesis moves after training
A Boss skill scroll unlocks a later technique; it does not replace the Orb or Core Training. Read the selected node’s Boss and scroll requirements after learning the preceding moves.
- Complete the final Mizunoto counter and check the Pyrokenesis unlock and mastery bar.
- Open M → Skill Tree on PC and find the Pyrokenesis branch.
- Select the first available move, read its point and prerequisite requirements, and unlock it.
- Use learned moves to build the art’s mastery. Inspect each next node for its own mastery, points and prerequisites before spending.
- Select the combat slot carrying the art and check the learned moves on the hotbar. Inspect the equipped weapon if the art row is missing.
If Pyrokinesis training or moves do not work
| Problem | Next action |
|---|---|
| Muzan offers conversion instead of power | Finish the conversion quest and use Muzan’s Blood, then return with the Biwa Bell. |
| An existing art blocks the new Orb | Read the current art replacement/reset prompt and its effects before removing your trained art. Keep the desired Orb ready. |
| The next exercise stays locked | Return to the preceding objective and confirm its completion row. Starting an activity is different from finishing it. |
| Mizunoto kills are not registering | Check the active row says Defeat Mizunotos and the earlier exercises are complete. Follow its marker and watch the counter after each fight. |
| Core Training ended but the hotbar is empty | Open the art branch and unlock a move node, then select the combat slot that carries it. |
Use tracking after an opening
The V attack now locks to a target's current position instead of the place it occupied earlier. That helps against movement, but you still need to secure a usable opening; tracking is not a guarantee through every defense.
The held X variant travels faster and C can be steered mid-move. On C, hyper armor has replaced invulnerability frames, so an opponent can still hurt you while the attack continues. Keep enough health and stamina to survive that trade.
Avoid the Blood name mix-up
Explosive Blood is another name for Pyrokinesis. Blood Manipulation is the separate Sickle-linked kit. If a video uses either name, compare the displayed Skill Tree and move animation before copying its build.
The full current move-name list has not been established here. Read your unlocked nodes in-game and avoid spending points based only on a pre-release name.
Continue your journey
Find more guides in the Slayers 2 Wiki & Database.